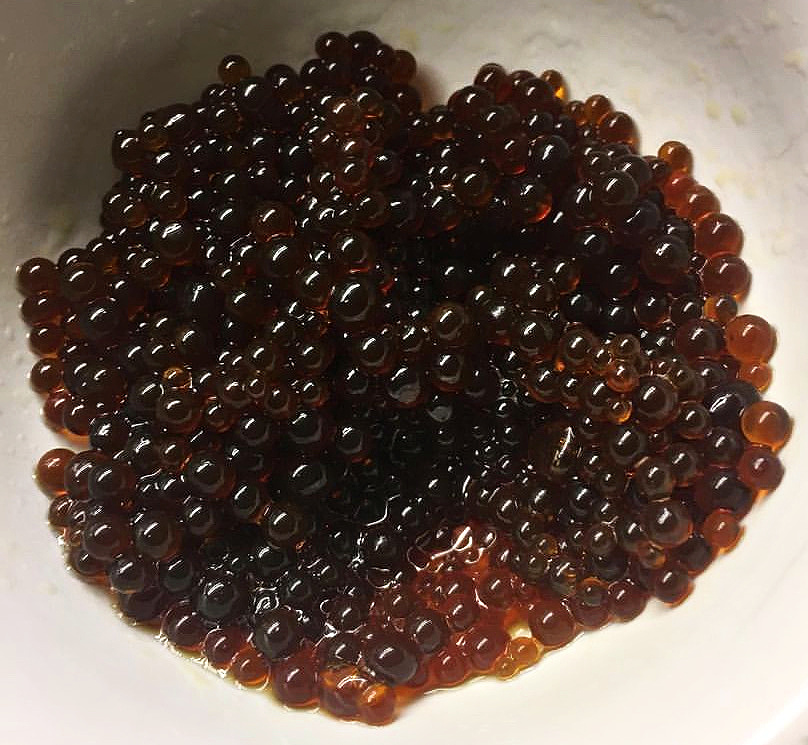
Soy Sauce Pearls
Soy sauce pearls are tiny bursts of umami goodness. These savoury little orbs are infused with the rich and savoury essence of soy sauce. Elevate your dinning experience by adding elegance and a sense of culinary adventure to a wide range of creations.
Equipment
- Tall glass or jar
- Whisk
- Fine Mesh Strainer
- Pipette or dropper
Ingredients
- 1 cup Soy sauce Ponzu or Yuzu are great options too
- 1 tsp Agar agar 2 grams or 1 teaspoon gelatin powder (3 grams) (see notes agar vs gelatin)
- Chilled oil – Canola, sunflower or vegetable oil (enough to fill a tall glass or jar)
Instructions
- Add the oil to a tall container and place it in the freezer for 30 minutes – 1 hour. (see note #1.)
- Combine the soy sauce and agar powder In a small pot, over medium heat and bring to a boil, whisking continuously until the agar has fully dissolved.
- Once boiling reduce heat and simmer for 2 minutes.
- Remove from heat and allow mixture to cool for 2-3 minutes.
- Working quickly, draw up the mixture into a syringe or pipette, while the liquid is still warm.
- Using a dropper or pipette, lightly drip the liquid into the cold oil to form the pearls.
- Try to keep the soy sauce pearls an equal size.
- Let the pearls sit in the oil for a few minutes
- Strain the pearls from the oil with a fine mesh strainer over a large bowl.
- Set the bowl of oil aside (see note #3.), and rinse the soy sauce beads well with cold water over your sink.
- Serve immediately or store in fridge until ready to use.
Notes
Tips for Making Flavour Pearls / Caviar:
- Consistency of Liquid: Ensure the liquid you are using is free of solids or impurities, as these can affect the consistency and texture of the pearls. A smooth, well-strained liquid works best.
- Temperature of Liquid: The liquid should be at room temperature or slightly warm when adding agar or gelatin to ensure smooth incorporation and avoid clumping. If using agar, be sure to boil the liquid for activation.
- Setting Process: For a smooth, consistent set, make sure the liquid has cooled slightly but is still in a pourable form before dropping it into the setting bath (often oil or cold water). The colder the setting bath, the quicker the pearls will form.
- Size of Pearls: To control the size of your pearls, use a syringe, dropper, or pipette. A finer tip will create smaller pearls, while a larger opening will yield bigger ones. For uniform pearls, consistency in droplet size is key.
- Oil Bath for Setting: To create pearls with a shiny, smooth surface, drop the flavoured liquid into a cold oil bath. Olive oil, vegetable oil, or any neutral oil works well, helping the pearls solidify without sticking to each other.
- Rinse After Setting: Once the pearls are set, rinse them gently in cold water to remove any excess oil (if using the oil bath method) and ensure they don’t stick together.
- Storage: Flavour pearls should be stored in a liquid that keeps them moist, like the original juice or water, to prevent them from drying out. If not used immediately, store them in an airtight container in the fridge. They typically last for about 2-3 days.
- Work Quickly: The longer the mixture sits in the saucepan, the more it will begin to solidify. Don’t worry if some of the first drops sit at the top. They will sink as you add more.
- Reuse the Oil: Don’t throw out the oil! The taste of the oil won’t be affected by the pearls. You can keep and store the strained oil for later use.
Tried this recipe?
 Mention @thewifewiththeknife or tag #wifewiththeknife